Saturday, October 31, 2015

Ring Wreath Christmas Cards

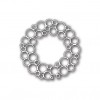
It's Halloween here in the states, but for me, it's the first day of the Hallmark Christmas Movies!!!!  OK...maybe you're not familiar with the Hallmark channel...but just think of a Hallmark greeting card made into a movie, with Christmas themes...tons of them all day, every day until after New Years Day...I'm not just in Haven, I'm in HEAVEN!!  I watched them while I made a couple Christmas cards to show you today.  The Ring Wreath by Simon Says Stamp is so much fun!!  You can use a bunch of different color combinations to make some fun Christmas cards...it's such a festive wreath!! The first one traditional, the second not so much:)!...
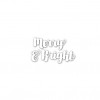
 I layered the wreath and added green die cut circles in 3 different greens.  I added glossy accents to give the circles a "fun" look.  I used the "Merry" from the Merry & Bright dies for both cards.  Here's a close up of the layering and glossy...

 The second one I used the red, black, silver and gray color theme.  I used some glossy black paper(some packaging from an embossing folder) for the frame, layered, and inserted semi shiny silver paper, gray, some of the black and 2 shades of red.
 I used the lighter red for the "Merry" and then glossy accented the darker red and used my Wink of Stella pen to give the lighter red circles and the "merry" some glitter:)!!...
Hope your Halloween has been happy...giving candy out, as I write...oops, there's the doorbell...gotta go!!   Thanks for visiting me today!! Hugs!! Lisa

Friday, October 30, 2015

Sketch Gifts...Christmas and Happy

I think the Simon Says Stamp Sketch Gift die is so cool!!  It came out with the STAMPtember® release in September with other wonderful Christmas products, but this die, because it's a gift box with a bow, is perfect for not only Christmas, but just about ANY occasion that has gift!!  I used an older set of Simon sentiment stamps, Essential Greetings for both cards...wonderful set!!  My first one is a Christmas card...
I told you that black, red, and silver are "in" colors for Christmas, so I HAD to make one:)!!  I layered my sketched gift and added a black die cut bow.  The speckled paper, as well as the striped paper is actually wrapping paper from Walmart.  Here's a close up of the layering and shiny silver outlined die...
Lest you think I'm kidding, here's a sample of the paper I used.  I DID roll some adhesive on white cardstock, then carefully layed the wrapping paper onto the adhesive cardstock to make it sturdy to work with.  I die cut the  present from two separate speckled trees.  Just wanted you to know:)!!...

The second one...a fun, happy one...I just used the word "Happy", so it could be used for lots of occasions...and it made me feel just....Happy:)!!
Again, layered the background rectangles...yes, 1"x1 1/4".  I actually tried 4 of each of those colors behind the gift, but didn't like any one color, but liked it when I put them all together (also allowed me to layer each rectangle with the 3 other remaining rectangles of each color that I didn't use:):)!!)...
I am having so much fun with the last couple releases from Simon...thanks for visiting me today!! Hugs!! Lisa

Thursday, October 29, 2015

Merry Christmas Circles a Snowflake...Two Ways

I used one of the sayings from the new Simon Says Stamp Circle Sayings Holiday stamp set, along witht the Nadine Snowflake die to make a couple fun, fast fixin' Christmas cards...
I die cut the stitched circle  from the striped panel, layered the snowflake die cut from shiny silver paper, stamped the sentiment and clear embossed, then popped up the panel after giving it a VERY thin black border.  Here's a close up... 
 The second one uses patterned paper for the top panel of the card, like the first, in fact, all like the first card, except a full stitched circle die cut and a square shaped card instead of a regular A2...
Tried a BUNCH of different colored snowflakes, but in the end, opted for a white...so white-on-white  it is...just liked it:)!! Here's a close up of the layering and popped panel...
These sentiments are so much fun!!...there are so many more that I will definitely make more cards with soon:)!!  Thanks for visiting me today!! Hugs!! Lisa

Wednesday, October 28, 2015

Snowflake Love Pendant

I used the Poppy Stamps Snowflake Love Pendant die to make a shiny silver snowflake card.  I die cut in silver and layered with a white layer underneath the silver.  I used two die cut pendants, cutting apart the snowflakes from the heart on one of the die cuts, and arranged them across the top of the card with the full pendant die cut.  I added a die cut heart made from a striped piece of paper, and added some black enamel dots.  I used a Penny Black "Love" die for my sentiment.  Here's a close up...
I planned on making another card using this die in a different way,  but will have to wait for another day...just not getting to it today:)!  Thanks for visiting me today!! Hugs!! Lisa

Tuesday, October 27, 2015

Sketch for You to Try 29

It's not too late to join in the fun over at Reverse Confetti for October's Sketch for You to Try:)!!  Here's my card and the sketch...

 OK...so much fun!!  Simply done by die cutting the Reverse Confetti Wreath Confetti Cut in white and orange/coral(then adhering the white on top of the orange) and Winter Words Confetti Cuts in white, layered  and used the kraft die cut center from the wreath to adhere in the center of the wreath in place of the center square.  I also used the Winter Words Coordinates sentiment stamp!


Check the sketch and details out over at the Reverse Confetti blog where you can check out the other Confetti Crew's interpretations of the sketch today...there's a prize for the winner of the challenge...how cool:)!!  Thanks for visiting me today!! Hugs!! Lisa

Sunday, October 25, 2015

A Merry Christmas Snowflake

I used an unused sentiment from yesterday's card to make another Christmas card...today with a framed snowflake in my "merry" colors... 
I cut 3 "squares"...actually 2 1/2 x 2 5/8" from 3 different colored papers, then die cut the Simon Says Stamp Nadine Snowflake on those papers.  I used an already layered Nadine die cut in white that I had on my desk, and used 2 areas of each of those colored snowflake die cuts to fit around the white layered flake.  I had done this a couple years ago after having seen Ardyth (she's AMAZING!) (I didn't originally link the cards, but wound up FINDING the card she AND I  made, cause she commented that she wasn't my inspiration, and I KNEW my memory wasn't THAT bad:):)!!) make a card like the one I've made today.  This snowflake is perfect for this because of it's makeup with the  triangles on both sides of 6 of the "arms" of the snowflake make it perfect to easily divide the colors.  Loved how the snowflake popped above the colored papers...love dimension...
Hope your weekend has been wonderful...have a great rest of your day!! Hugs!! Lisa

Saturday, October 24, 2015

A Couple Graphic Christmas Cards

I used a stamp set from the Simon Says Stamp STAMPtember® release, Graphic Christmas to make a couple Christmas cards...
 I stamped the tree and colored with markers.  I stamped the rounded rectangle (with my MISTI, so I could stamp repeatedly for a richer color red) and cut around and out the middle and slightly popped up over the tree.  Added a die cut heart and glossy accented the heart...

I used the smaller tree and frame for my second card, coloring with untraditional colored markers.  I also used the "Christmas" sentiment but instead of black ink, I used a bright pink.  I also die cut the top panel with a stitched rectangular die from Simon.
 Again, I cut out the rectangles and trees from the frames ( I used my Fiskars fingertip swivel exacto to cut out) and popped up over the colored trees.  
Had so much fun simply stamping and using some scissors to make my graphic cards...well, did die cut the heart and outside of panel, but basically a stamped card....and A LOT OF FUN!!!  Thanks for visiting me today!! Hugs!! Lisa